What You Will Find Here
- Managing Journey Maps: Organize and maintain your collection of maps.
- Defining Customer Personas: Filter datasets to view specific customer segments.
- Adding Map Descriptions: Document the purpose and scope of your journey.
- Establishing Map Structure: Build the foundational grid for your data.
- Managing Journey Stages: Define the horizontal process steps.
- Adding Content and Analysis Sections: Enrich the map with qualitative and quantitative details.
- Analyzing Metrics and Charts: Visualize performance and trends with real-time data.
Who Can Access?
-
All users with the necessary permissions can access these features.
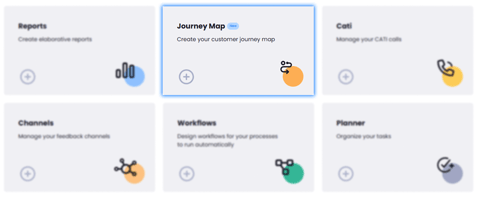
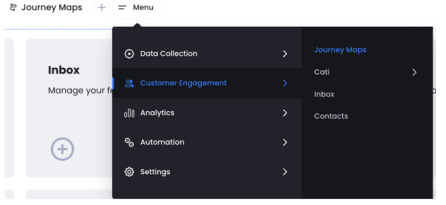
How to Access
You can reach the Journey Map page using two methods.
Primary Path
- Click the Main dashboard.
- Select Journey Map.
Alternative Path
- Click the menu button in the top bar.
- Select Customer engagement.
- Click Journey maps.
What You Can Do Here
Managing Journey Maps
This centralized screen allows you to manage all existing journey maps. You can see high-level details about who created the maps and when they were last modified.
- View the list containing Map Name, Created By, Creation Date, Last Updated Date, and Last Updated By.
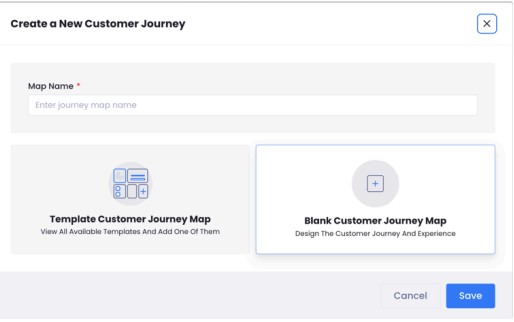
- Click the Add button to open a new modal.
- Enter a name for your map and save it.
- Use the options on the listing page to view, duplicate, or delete existing entries.
You can now organize and maintain your maps from a single dashboard.
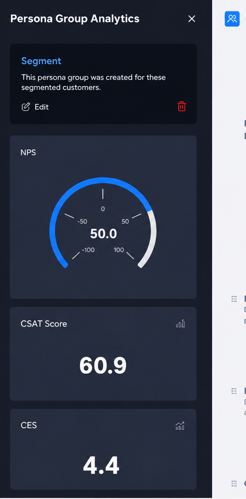
Defining Customer Personas
You can customize your journey maps to reflect the experiences of specific customer groups. This allows you to view data that only applies to the segments you select.
- Open the persona settings by clicking the icon on the left of your map title.
- Select criteria from the available schema fields. These fields include options like age groups, student status, or specific demographics.
- Apply the filters to your dataset.
The system applies the selected filters to all visualizations. If you do not define a persona, the map includes all available data.
Notes / Tips / Warnings:
- The system uses AND logic for all filters.
- When you define schema fields, the Metric and Chart sections update automatically.
- The system will include ready-made persona templates in a future update.
Adding Map Descriptions

This feature allows you to define the context for your journey map. You can record the purpose and goals to ensure all team members understand the scope of the project.
- Add one or more description blocks to your map.
- Use the drag and drop tool to change the order of the blocks.
- Use the toggle to collapse or expand sections to save space.
The map now includes documented context that is easy to organize and read.
Establishing Map Structure
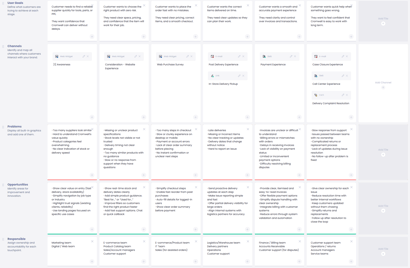
You build the core framework of your map using a grid-based layout. This structure organizes how your stages and sections interact.
- Your Columns are defined as Stages.
- Your Rows are defined as Sections.
This creates the primary grid structure for the journey map.
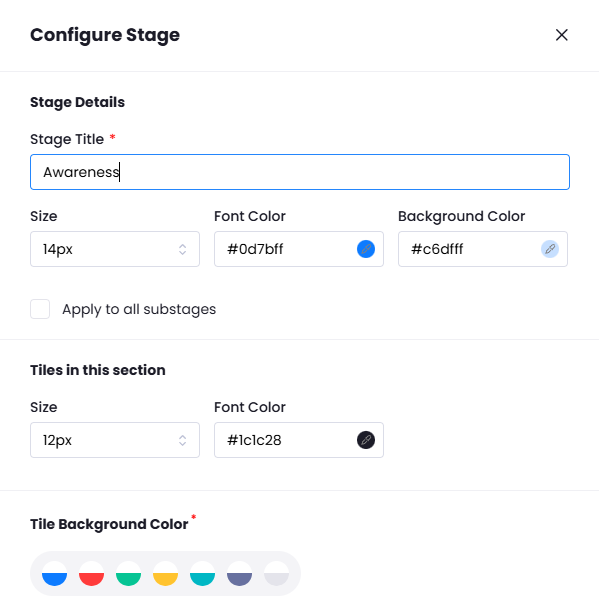
Managing Journey Stages
![]()
Stages represent the horizontal progression of the customer experience. You can structure these process steps to match your specific customer lifecycle.
- Add a new stage or add substages to break down the process.
- Rename stages to match your internal terminology.
- Click the hide icon to remove specific stages from the current view.
- Use the style tools to change colors and fonts.
- Move stages into a new order using the drag and drop feature.
You have a fully customized horizontal progression for your journey map.
Notes / Tips / Warnings:
- Each stage contains a dedicated settings menu for individual adjustments.
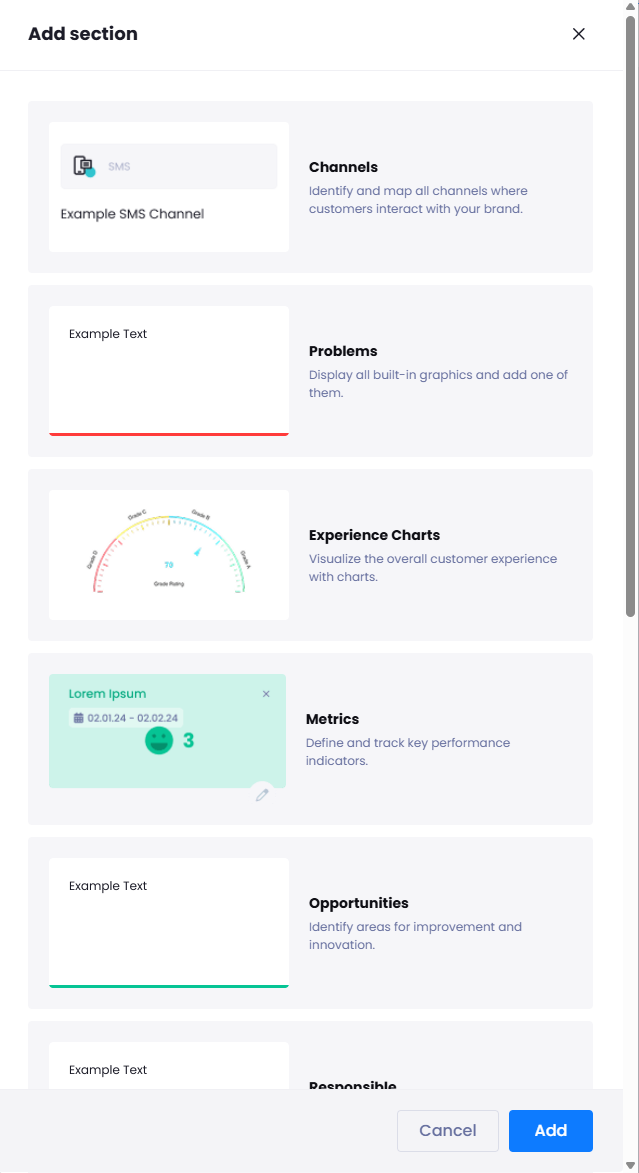
Adding Content and Analysis Sections
Sections allow you to add specific data types and interaction layers to your map. You can get a full view of the customer experience.
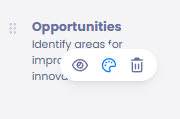
- Add sections such as Customer Goal, Channel, Problem, Opportunities, Text, or Responsible Teams.
- Customize the look of these sections by changing colors, fonts, or names.
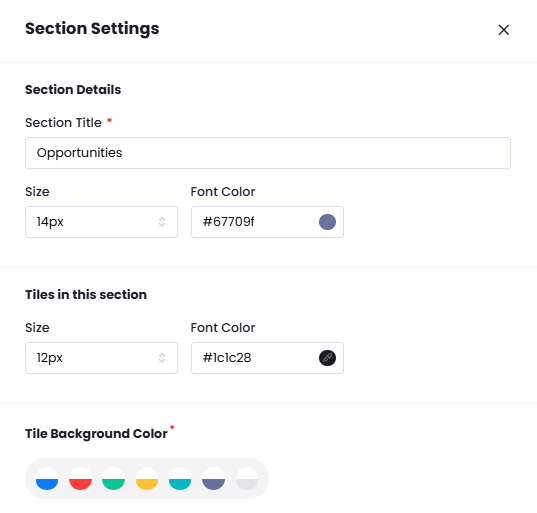
- Use the drag and drop tool to reorder sections.
- Insert text fields, emojis, images, and links.
- Connect these sections to the Planner module.

The map is now updated with specific details regarding customer goals and performance metrics.
Notes / Tips / Warnings:
- Problem sections appear in red by default.
- Opportunities sections appear in green by default.
- You can customize these default colors in the settings.
- The Channel section acts as a filter for your metrics.
Analyzing Metrics and Charts
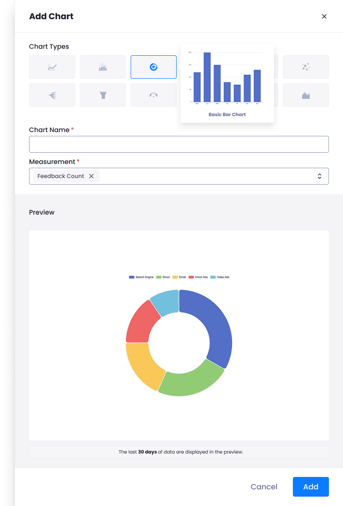
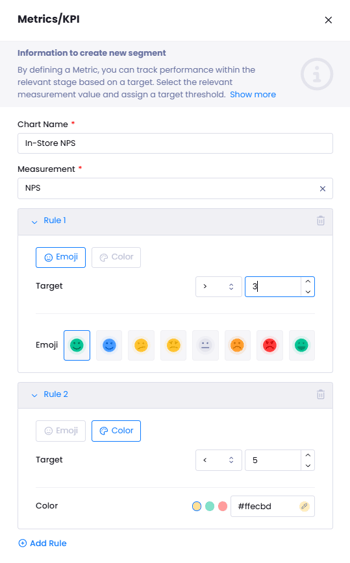
This module allows you to measure performance using real-time data. You can set targets and create visual indicators to see if you are meeting your goals.
- Select a metric such as NPS, CSAT, CES, or Sentiment Score.
- Choose a chart type like Trend, Bar, Pie, or Card.
- Enter a target value for your metric.
- Create value ranges to trigger visual indicators.
- Set specific emojis or background colors to represent different value ranges.
The system generates visualizations that show performance trends based on your selected channels and personas.
Notes / Tips / Warnings:
- Comparisons occur on a channel basis.
- If you do not select a channel, the system includes data from all channels.
- Persona filters apply to all chart results.
Limits / Notes
- Module Integration: Customer Goal, Problem, Opportunities, Text, and Responsible Teams integrate with the Planner module.
- Future Updates: Ready-made templates will be available in future product phases to help you create maps quickly.